
Ever thought about saving money and caring for your car at the same time? Learning to change your oil yourself is a smart choice for car owners. We’re excited to share a complete guide on how to do a DIY oil change that’s easy to follow, whether you’re new to it or need a refresher.
At Dennis Sneed Ford in Gower, Missouri, we think knowing how to care for your car is empowering. Our service center can change your oil for you, but knowing how helps you bond with your vehicle. This guide will show you how to get started, from gathering tools to doing safety checks.
Complete DIY Oil Change Guide
You’ll learn about different oil types, how to safely drain the oil, and how to replace filters. By the end, you’ll feel confident in keeping your engine in top shape between visits to our dealership.
Your vehicle’s owner’s manual is key to a successful oil change. It tells you about oil capacity, viscosity, filter numbers, and safe jacking points. Keep it close by while you work through each step of the process.
What You’ll Need for Your DIY Oil Change
Having everything ready can make your oil change smooth. It’s all about being prepared. We’ll show you what tools, oil, and filters you need before starting. Gathering your supplies ahead of time ensures a seamless experience.
Gathering Your Tools and Supplies
You’ll need some important items for a safe oil change. A floor jack and jack stands are essential for lifting your car. Never use a jack alone, as it’s very dangerous. A big drain pan is needed to catch the old oil—most cars hold five to seven quarts, so pick a pan that can hold at least that.
Floor Jack & Jack Stands
Essential for safely lifting and supporting your vehicle while you work underneath
Drain Pan & Socket Wrench
Catch old oil and remove the drain plug with the right size socket (13mm, 14mm, or 15mm)
Filter Wrench & Funnel
Remove the old filter easily and add new oil without spills
Don’t forget rags or paper towels for cleaning up, and wear gloves and safety glasses for protection. Having all these tools ready before you start makes the process much smoother and safer.
Understanding Motor Oil Options
Choosing the right motor oil depends on your car and how you drive. The manual will tell you the recommended viscosity, like 5W-30 or 10W-40. These numbers affect how the oil works at different temperatures, which is important for your engine and fuel efficiency.
You can pick from conventional, synthetic blend, or full synthetic oil. Each has its own benefits and cost considerations. Conventional oil is good for older cars and regular driving. Synthetic blends offer better protection at a moderate price. Full synthetic oil is best for extreme temperatures and tough driving conditions.
| Oil Type | Best For | Temperature Performance | Change Interval |
|---|---|---|---|
| Conventional | Older vehicles, light-duty use, budget-conscious drivers | Adequate in normal conditions | 3,000-5,000 miles |
| Synthetic Blend | Newer vehicles, moderate driving demands, balanced protection | Better high-temp resistance | 5,000-7,500 miles |
| Full Synthetic | High-performance engines, extreme conditions, maximum protection | Excellent in heat and cold | 7,500-10,000+ miles |
If you’re not sure what oil is best for your car, our team at Dennis Sneed Ford in Gower, Missouri can help. We know what different vehicles need and can recommend the perfect match for your driving conditions.
Finding the Right Filter
Every oil change needs the right filter for your car. Filters come in different sizes, thread patterns, and filtration levels. The wrong filter can cause problems like poor oil flow or leaks. Your manual will tell you the correct filter part number, or you can check with our parts department for an OEM-quality filter.
Before putting in the new filter, apply a bit of oil to the rubber O-ring. This helps the filter seal properly and makes it easier to remove next time. Choosing the right filter is as important as picking the right oil for your engine’s health.
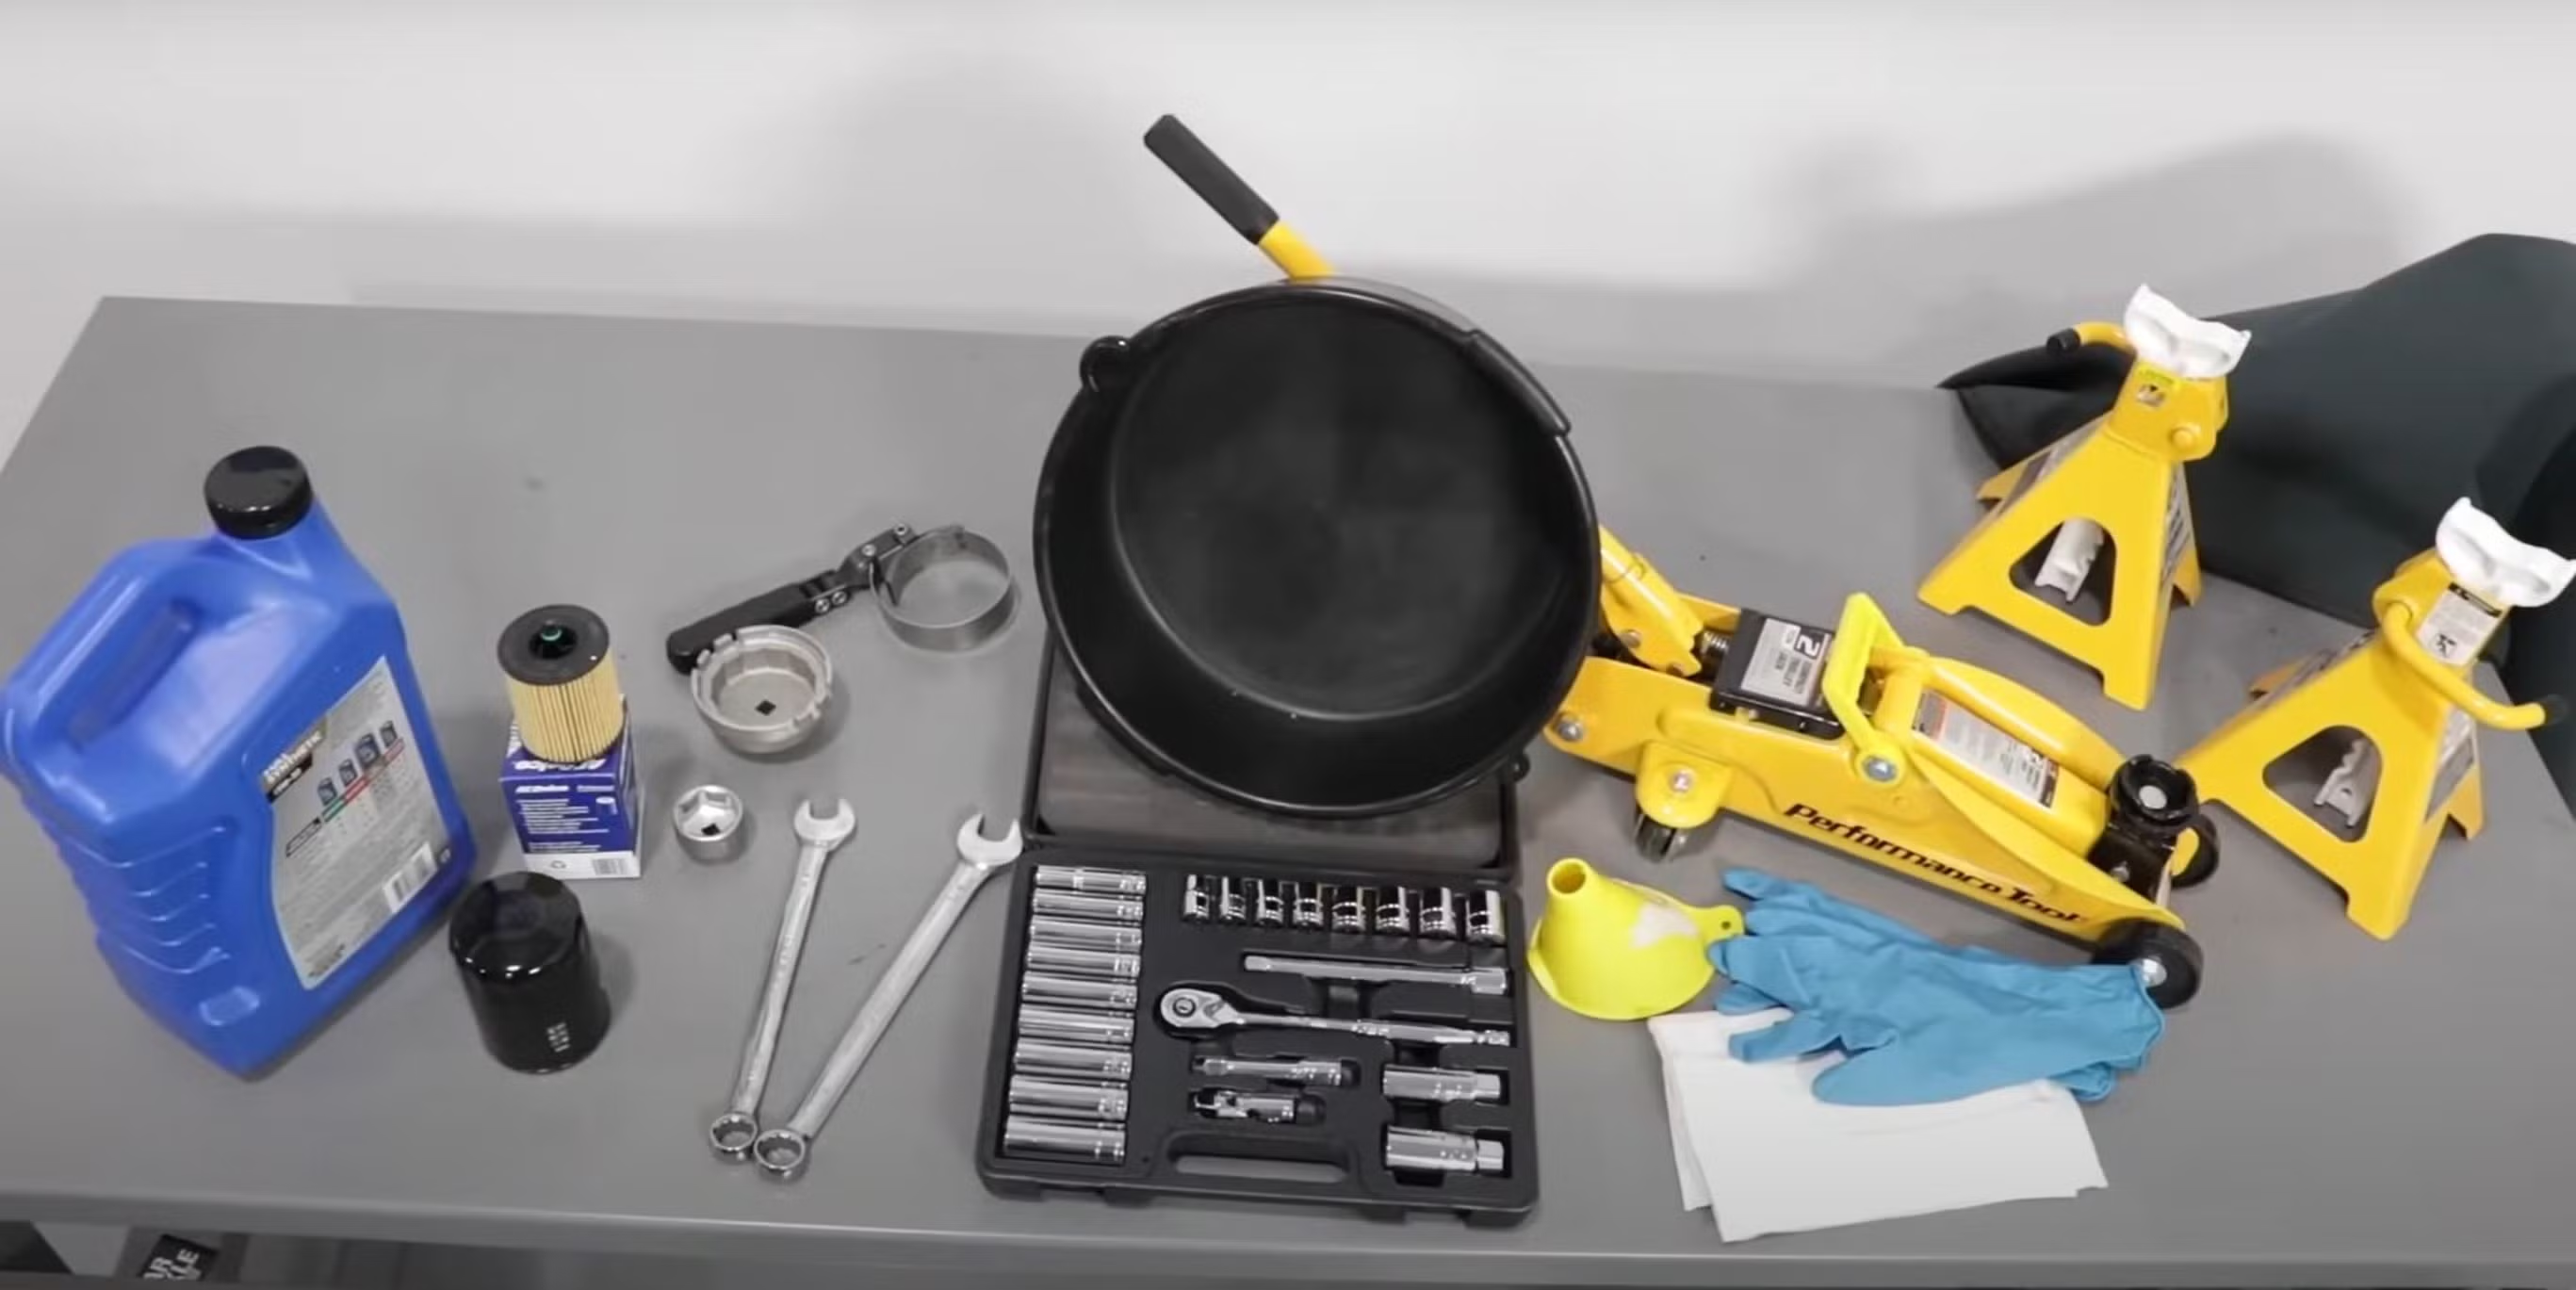
Having the right tools ready makes your DIY oil change smooth and efficient
How to Change Your Oil: Step-by-Step Instructions
Are you ready to do your first oil change? We’ll walk you through each step to make sure you do it right. Changing your oil might seem tough at first, but many people do it at home successfully. Always put safety first, take your time, and double-check your work. If you’re unsure at any point, Dennis Sneed Ford’s experts are here to help.
Prepare Your Vehicle and Workspace
Before you start, make sure your workspace is safe. Park on a level surface and engage the parking brake. A level surface helps with oil level checks and prevents the car from moving. If your engine is cold, warm it up for 2-3 minutes. Warm oil drains better than cold oil, but don’t let it get too hot to avoid burns.
Check your owner’s manual for the right jack points. Use a floor jack to lift the car, then place jack stands under the frame. Make sure the car is stable before you start. Never get under a car supported only by a jack—jacks can fail, and it’s dangerous. Jack stands add the extra safety you need.
Open the hood and find the oil fill cap. Remove it to let air in, which helps the old oil drain better. Put your tools within reach under the car before you begin.
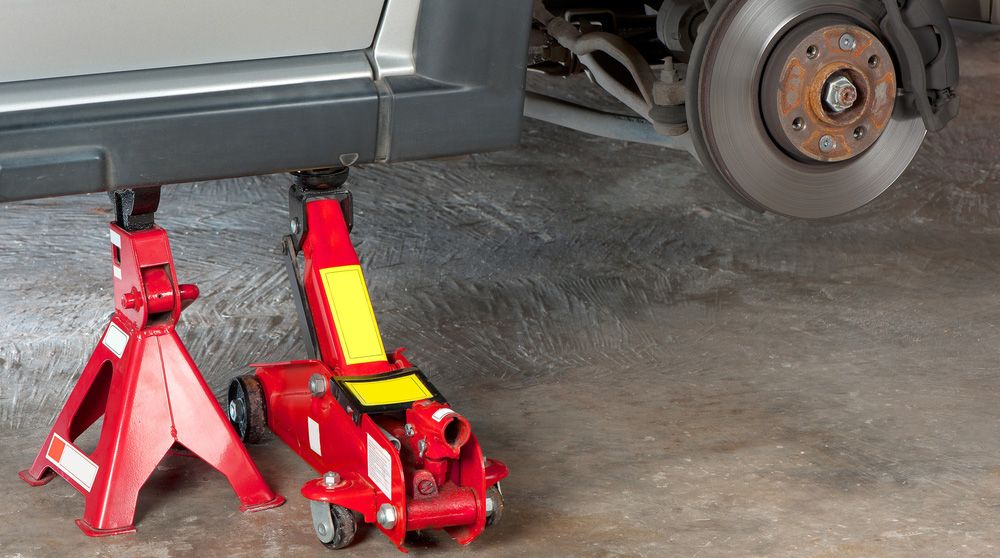
Always secure your vehicle on jack stands before working underneath
Drain the Old Engine Oil
Slide under the car with your drain pan and socket wrench. Find the oil drain plug at the bottom of the oil pan—it’s usually a bolt at the lowest point. You’ll need a 13mm, 14mm, or 15mm socket, depending on your car.
Place your drain pan under the plug, positioned a bit forward since oil flows at an angle at first. Use your socket wrench to loosen the plug by turning counterclockwise. Then remove the wrench and finish unscrewing by hand. Keep pressure on the plug as you remove the last threads and pull it out quickly to avoid dropping it into the oil.
Let the oil drain completely—this takes 5-10 minutes, depending on your engine and oil temperature. You’ll know it’s done when the flow slows down to drips. Check the drain plug’s threads and washer for damage and replace if needed. Some cars use a crush washer that needs replacement with each oil change.

Position your drain pan correctly and allow the old oil to drain completely
Replace the Oil Filter
While the oil drains, find your oil filter. It might be above or below your engine. Place your drain pan under the filter since it holds about one cup of oil. Try to loosen the oil filter by hand first. If it’s too tight, use an oil filter wrench. Once loose, remove it by hand, tipping the open end up to prevent spills.
Look at the engine’s filter mounting plate carefully. The rubber O-ring from the old filter must come off with it. If you install a new filter without removing the old O-ring, you’ll have a leak. Clean the mounting surface with a clean rag.
Take your new oil filter and find its rubber O-ring. Dip your finger in fresh motor oil and run it around the O-ring. This helps it seal better and makes removal easier next time. Thread the new filter onto the mounting plate by hand, turning clockwise. Never use a filter wrench to install a filter. Tighten it until the O-ring contacts the engine, then follow the filter’s instructions—most need three-quarters to one full turn after contact.
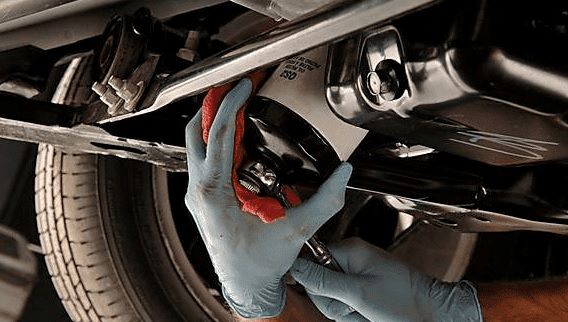
Apply fresh oil to the new filter’s O-ring before installing by hand
Add Fresh Motor Oil
With the new filter on, go back to the drain plug. Clean the plug threads and oil pan threads with a shop towel. Check the drain plug for thread damage. Hand-thread the plug into the oil pan, turning clockwise. Thread it in as far as you can by hand to avoid cross-threading.
Use your socket wrench to tighten the drain plug firmly but don’t overtighten—you can strip the threads or crack the oil pan. If your owner’s manual gives a torque value, use a torque wrench. Most drain plugs need 25-35 foot-pounds of torque.
Move to the top of your engine and find the oil fill opening. Put your funnel in the opening. Check your owner’s manual for how much oil you need—usually 4-6 quarts, depending on your engine. Pour in about three-quarters of the oil slowly, then add the rest in half-quart increments. It’s better to add small amounts and check often than to overfill. Once you’ve added the right amount, put the oil fill cap back on and make sure it’s tight.

Use a funnel to add fresh oil slowly, checking the level frequently
Check Oil Level and Inspect for Leaks
Start your engine and let it run at idle for 30-60 seconds. Watch your dashboard—the oil pressure warning light should turn off soon. If it doesn’t, turn off the engine and check for problems. While the engine runs, check the drain plug and oil filter for leaks. Look for drips or wet spots. A little oil on the outside is okay, but active dripping means a problem.
After confirming no leaks, turn off the engine and wait 30-60 seconds for the oil to drain back into the oil pan. Remove the dipstick completely and wipe it clean. Put the dipstick back in and pull it out again right away. Check where the oil level falls on the dipstick markings—it should be between the “Add” and “Full” marks, ideally near the full line.
If the level is low, add oil in quarter-quart increments, waiting a moment between additions and checking again. Never overfill your engine—too much oil can damage seals and increase crankcase pressure. Once you’ve confirmed the right oil level and no leaks, remove your jack stands and carefully lower your vehicle.

Verify the oil level is between the “Add” and “Full” marks on your dipstick
Quick Reference: Oil Change Steps at a Glance
Use this handy reference table to guide you through each phase of your oil change. Each step includes key actions, safety precautions, and estimated time to help you plan your DIY maintenance session.
| Oil Change Step | Key Actions | Safety Caution | Estimated Time |
|---|---|---|---|
| Prepare Vehicle & Workspace | Park on level surface, raise vehicle, secure with jack stands, remove oil fill cap | Never work under vehicle supported only by jack; always use jack stands | 10-15 minutes |
| Drain Old Engine Oil | Remove drain plug, allow complete drainage, inspect plug and washer | Oil may be hot; keep firm grip on drain plug to prevent dropping into oil | 10-12 minutes |
| Replace Oil Filter | Remove old filter, clean mounting surface, lubricate new O-ring, install hand-tight | Verify old O-ring removed from engine; don’t overtighten new filter | 5-8 minutes |
| Add Fresh Motor Oil | Reinstall drain plug to spec, pour correct oil amount through funnel, secure fill cap | Don’t overtighten drain plug; avoid overfilling engine with oil | 8-10 minutes |
| Check Level & Inspect for Leaks | Run engine 30-60 seconds, check for leaks, verify proper oil level on dipstick | Oil pressure light should turn off within seconds; shut down if it remains on | 5-8 minutes |
Congratulations on completing your DIY oil change! Write down the date, mileage, and type of oil used in your maintenance log. This helps you remember when your next oil change is due.
Oil Change Frequency and Maintenance Tips
Maximizing engine life depends on three key factors: knowing when to change your oil, choosing the right oil type, and disposing of used oil properly. These tips help you care for your engine effectively, ensuring your vehicle runs well and saving you money over time.
When Should You Change Your Oil?
The old “every 3,000 miles” rule is outdated for most cars today. Modern engines and better oils mean many vehicles can go much farther without needing an oil change. Check your owner’s manual for the recommended interval, which is usually between 5,000 to 10,000 miles.
However, these guidelines assume normal driving. If you drive under severe conditions, you’ll need to change your oil more often. Severe service includes short trips, stop-and-go traffic, extreme temperatures, and dusty conditions. If you drive in these conditions, follow the more frequent schedule in your manual.
At Dennis Sneed Ford in Gower, Missouri, our advisors consider your driving habits and vehicle needs. We help you find the best oil change interval for your engine’s protection and your schedule.
Which Oil Type Is Best for Your Vehicle?
The debate between synthetic and conventional oil focuses on performance, protection, and cost. Conventional oil is refined from crude petroleum and works well for many vehicles. It’s less expensive and suitable for regular driving. Older vehicles and those with simpler engines often do well with conventional oil.
Synthetic oil is made to perform better in tough conditions. It flows better in cold weather, resists breakdown in heat, and lasts longer. Synthetic oil also offers better engine protection and can improve fuel efficiency slightly. Synthetic blend oils mix conventional and synthetic base stocks, offering some synthetic benefits at a lower cost.
| Oil Type | Best For | Change Interval | Cost Level |
|---|---|---|---|
| Conventional | Older vehicles, simple engines, normal driving conditions | 3,000-5,000 miles | Lowest |
| Synthetic Blend | Moderate performance needs, budget-conscious drivers | 5,000-7,500 miles | Moderate |
| Full Synthetic | Newer vehicles, high-performance engines, extreme conditions, towing | 7,500-15,000 miles | Highest |
We usually recommend synthetic oil for newer vehicles, turbocharged engines, and extreme conditions. While it costs more upfront, its longer change intervals and superior protection can save you money in the long run.
How to Dispose of Used Oil Properly
Used motor oil is hazardous waste and must be disposed of correctly to protect the environment. Improper disposal can contaminate large amounts of groundwater. Never pour used oil down drains, onto the ground, or in trash containers.
Seal & Store
Transfer drained oil into a sealed container with a tight-fitting lid to prevent spills
Find Drop-Off Locations
Many auto parts stores and recycling centers accept used oil for free
Dispose of Filters
Drain filters for 12+ hours before taking them to facilities that accept used oil
Our service center at Dennis Sneed Ford follows all environmental regulations for oil disposal and recycling. We’re dedicated to protecting our community’s environment and help local DIY mechanics find responsible recycling options in Gower, Missouri.
Keep Your Vehicle Running Smoothly with Dennis Sneed Ford
This guide should make you feel ready to replace your engine oil. At Dennis Sneed Ford in Gower, Missouri, we want to help you keep your car in top shape. Not everyone can do their own car maintenance, and that’s where our team comes in.
Our service center has top-notch equipment and certified technicians for quick, safe oil changes. When you come to us, we use the best oils and filters. We also do a free multi-point inspection, checking fluids, belts, brakes, and tires to find issues early.
Our service department makes scheduling easy and prices clear. We only suggest services you really need. Whether you like to fix things yourself or need our help, we’re here for you.
Visit Dennis Sneed Ford in Gower, Missouri, or call us to book your next service. We’re dedicated to meeting your car’s needs. Your vehicle deserves the best care, whether at home or at our service center.

